MTK6250 Bluetooth 1.54" LCD Watch Firmware installation. How to flash firmware on RKM M3, Podoor MI W2 or PW305 watches


This is a simple tutorial on how to flash firmware on RKM M3, Podoor MI W2 or PW305 Linux watches.

1. First, you'll have to download the firmware archive 'MTK6250 Bluetooth 1.54 LCD Watch firmware' from here, here or here.
2. Install driver for the smart watch. Extract the archive and search 'USB_Driver_exe_v1.1032.1' driver. Run 'InstallDriver.exe' as Admin and install the drivers. I have Windows 8.1 Pro x64 and it worked with no problem at all.
3. Open “download” folder, double click “MultiPortFlashDownloadProject, click up and left corner 'File---Open Download Agent File', select 'download folder----MTK_AllInOne_DA.bin', and then click “open”. Next you have to choose the firmware version which you want to flash (between W2-MI_TR_V2_5 and V2_7_podoor), click 'Image Folder' and then go to where you store the firmware. After finishing above steps, click 'Start All' (down and right corner), power off your watch, and then connect watch to computer via USB data cable. During burning time, the data will keep updating, it is normal, don’t worry. (red line, yellow line, blue line and finally the green line). When green color line is displayed it means that the flashing was successful.
4. Next operation is needed once upgrade successfully,
Go to Dialer option (i.e. dial phone number), input *20# (long press digit 7 to input *,long press 9 to input #). Click Device --> Click Set UART --> Click UART setting --> In the first line of the USB port 2, click the right arrow keys, showed none, then click on the upper right corner the three point(stands for save settings), watch will shut down after 3 seconds. Boot again can be used normally.
5. Install the provided 'SmartWatch2_20.apk' on the Android devices you want to pair with your smart watch.

For more details please watch the video below.

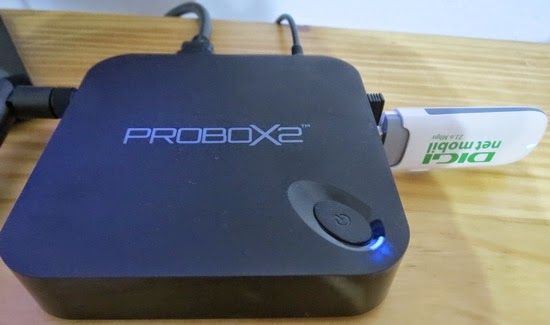
3G Mobile Data Connection works just great on Probox2 EX TV Box.


3G Mobile Data Connection works just great on Probox2 EX TV Box. Tested with Huawei E3131 USB dongle. Just disable WiFi and Ethernet connections and plug in the 3G USB dongle. Wait a couple of minutes and you're done.

For more details please watch the video below.
 

How to easily flash firmware on Probox2 EX Media Player with Amlogic S802-H CPU


This is a simple tutorial on how to easily flash firmware on Probox2 EX Media Player with Amlogic S802-H CPU.

1. First, download the stock firmware from Probox2 website probox2.com or from here, here or here. (PROBOX2-EX-20140805 firmware version).
2. Download AMLogic USB Burning Tool v2.0.0.140306_Alpha. It's working also on Windows 8.1 64 bit (my PC OS), but you'll have to disable driver signature enforcement. Then you have to put Probox2 EX Media Player in flash mode. To do that, prepare a thin metal stick / paper clip, then press and hold the restore button (inside the AV port hole) and press Power button at the same time. After 3-5 seconds USB_Burning_Tool will detect the USB device. (with the DC and OTG USB cable  plugged in). Install AMLogic USB Burning Tool v2.0.0.140306_Alpha and the drivers.
3. Launch USB_Burning_Tool, change the language to English. Click 'File' and choose 'Import image', choose the .img file you just download. Click "Start" to start firmware upgrade, it should take around 3-4 mins and please do NOT power off / unplug PROBOX2 EX during firmware upgrade. After finished firmware upgrade, it will auto disconnected. Now you can unplug it and connect to TV again.

For more details please watch the video below.


How to easily install Adobe Flash Player on Probox2 EX TV Box running Android KitKat


This is very simple indeed. Just read this article and follow the instructions from the below video.
Enjoy!

Probox2 EX Extreme Media Player unboxing & first impressions


I just received this extraordinary Android TV Box & Extreme Media Player, so this article is not a full review, this is just an unboxing and I'll share with you my first impression on this amazing device.
Probox2 EX is a very powerfull Android Mini PC with a Amlogic S802-H processor, 2 GB of RAM and 16 GB of eMMC storage. This device is using the same hardware as Minix Neo X8-H, but it comes in a more complete configuration, it has dual band Wi-Fi and hardware DTS and Dolby audio decoding. It also has a gamepad with integrated sound and it claim to be the best Android Mini PC available on the market in the present. Probox2 EX Extreme Media Player costs only 149 dollars with free shipping. It is offered as a gift a nice Remote+ (worths $32).


The Probox2 EX Extreme Media Player package includes:
- Probox2 EX Extreme Media Player
- Probox2 Remote+
- IR Remote controller
- HDMI cable
- USB cable
- AV Cable
- DC Adapter
- user manual.


Probox2 EX Specifications
CPU: Amlogic S802-H Quad Core Cortex A9 CPU, up to 2Ghz
GPU: Octo Core Mali-450 GPU, up to 600Mhz
Memory / Storage: 2GB DDR3 / 16GB eMMC
Wireless Connectivity: 802.11n Dual Band WIFI (2.4Ghz / 5.8Ghz), Bluetooth 4.0
OS: Android KitKat 4.4
Video Output: HDMI 1.4b, up to 4K** @ 30fps, Support HDMI-CEC
Audio Output: Via HDMI 1.4b, optical SPDIF
Power: DC 5V 2A adapter (CE, FCC, CCC Certified)
Peripheral Interface: RJ-45 Ethernet Port (10/100Mbps), USB 2.0 Port x 2, OTG Port, TF Card Reader, AV Port, IR Sensor (Remote included)
Dimensions / Weight: 115mm * 115mm * 26mm / 200g

First Boot & First Impressions
The set-up of the media player is very simple, just connect the HDMI cable, WiFi or an Ethernet cable, the Wi-Fi antenna, the RF dongle for Remote+, the power adapter to Probox2 EX and you're done. Now pressi the power button on the box and it will boot very quickly.
The User Interface is awesome, it has big tiles like Metro / Modern UI of Windows 8 / Windows 8.1. This is very useful for the smaller display TVs.
The interface is very intuitive and friendly, and soon you'll get used to it. 
The remotes work just fine out of the box (you will have to put the batteries) and the OS moves very fluid and fast.


In Antutu X Benchmark this great device scores an amazing 37.245 points; so
this is definitely my new favorite tv box.


Probox2 EX Extreme Media Player vs RKM MK902 TV Box
 

Download latest stock firmware for Beelink M8B TV Box


Download latest stock firmware for Beelink M8B TV Box from here or here.

Firmware: M8B_108k4_beelink
Model: Beelink M8B TV Box
Image file size: 361 MB  
Platform: AMLogic S802B

Download latest stock firmware for Mele A1000G TV Box


Download latest stock firmware for Mele A1000G TV Box from here or here.

Firmware: A1000G Quad V3.1.7_SD Card
Model: Mele A1000G TV Box 

Image file size: 334 MB 
Platform: Allwinner A31
FW version: 3.1.7
Style: A1000G_HW_SDK12

Download DragonFace latest version v.2.2.0


Dragonface is a very intuitive piece of software that will let you edit and modify A10, A13 and A31 firmware images. You can quickly change your boot logo or animation; of course, you can do much more,  pull, push and edit Init.rc or Script.fex,  remove and add APK's, change basic info.


Download DragonFace v.2.2.0 from here, here or here.
You can find the previous versions here.

Download Jelly Bean Stock Firmware for Jiake JK13 smartphone


Download Jelly Bean Stock Firmware for Jiake JK13 smartphone from here or here.

Archive name: JIAKE JK13 MTK6572-169699 20140320.rar
Archive file size: 216 MB
Support: Mediatek MT6572
Project:  yuanda72_wet_a_jb3
Config_version: V1.1.1


Download stock firmware for EKB328 TV Box with RK3288 SoC


Download stock firmware for EKB328 TV Box with RK3288 SoC from here, here or here. More details about EKB328 TV Box you will find here.


Firmware: update_EKB328_8.25  
Model: EKB328 TV Box  
Image file size: 307 MB 
Platform: RK3288

Download latest stock firmware for Onda V989 Octa Core Tablet


Download latest stock firmware for Onda V989 Octa Core Tablet from here or from here. You can root it with this tool.

 
Firmware: V989 Core8_v2.0_v4
Model: Onda V989 Octa Core Tablet
Image file size: 451 MB
Platform: A31s


Onda V989 Octa Core Tablet Specs
CPU: A31s Quad Core
GPU: Power VR SGX544
RAM     1GB,DDR3
Storage  16GB
Screen: G+G Capacitive Touchscreen, 1024*768 High-resolution Screen
Size:   9.7 inch
Display:  HD TFT Screen
Resolution:    1024*768 Pixels
Visible Angle: 178°
Dual Camera     Front camera, 2.0 Megapixels  Back camera, 2.0 Megapixels
 

How to Root Using Android 4.4.2 KitKat Firmware On Samsung Galaxy S5 (All Models) Guide


Announced in February 2014, Samsung Galaxy S5 is now available for purchase in several countries around the world. The Galaxy S5 comes in some variants and runs Android 4.4.2 KitKat out of the box.
Samsung Galaxy S5 users who wish to root their devices, may follow the tutorial below.
This tutorial uses CF-Auto-Root file released by Senior Recognized XDA-Developers, Chainfire. Head over to the CF-Auto-Root main thread to learn more about the root method.
Disclaimer: Rooting voids the warranty of your device. We and the developer of this rooting procedures shall not be held responsible if any undesirable outcomes may happen to your device. use of this root guide is solely at your own risk!

Pre-requisites
1. Install USB Drivers for Samsung Galaxy S5 on the computer.
2. Enable USB Debugging Mode on the phone by navigating to Settings >> Developer Options.
3. Make a backup of all your important data before following the guide.
4. Ensure the battery of the phone is charged more than 80 percent.
5. The CF-Auto-Root file works only on the Galaxy S5. Applying this to any incorrect variant might brick the device. Verify the model number of the Galaxy S5 by navigating to Settings >> About Phone.

Files Required
1. CF-Auto-Root
2. Odin 3.09

Steps to Root Galaxy S5 Running on Android 4.4.2 KitKat Firmware
Step 1: Extract CF-Auto-Root and Odin 3.09 files using WinRAR/7-Zip/WinZip or any other extracting tool.
Step 2: Switch off the Galaxy S5. Then boot into Download Mode by pressing and holding Volume Down, Home and Power buttons together until a construction Android robot icon with a warning triangle appears on screen. Now press the Volume Up button to enter Download Mode.
Step 3: Launch Odin on the computer as an Administrator.
Step 4: Connect the Galaxy S5 to the computer using USB cable while it is in the Download Mode. Wait until Odin detects the device. When the device is connected successfully, the ID: COM box will turn to light blue with the COM port number. Additionally, the successful connected will be indicated by a message saying Added.
Step 5: In Odin, click the AP button and select the CF-Auto-Root .tar.md5 file.
Step 6: Verify that Auto Reboot and F. Reset Time checkboxes are selected in Odin. Also, ensure the Re-Partition option is NOT selected.
Step 7: Double-check and click Start in Odin. The installation process will now begin.
Step 8: Once the installation process completes, your phone will restart and soon you will see a PASS message with green background in the left-most box at the very top of the Odin. You can now unplug the USB cable to disconnect it from the computer.

Samsung Galaxy S5 running on Android 4.4.2 KitKat is now rooted successfully. You can now install any app that requires root permission. Verify the root status of the device by downloading Root Checker app from Google Play Store.

Note: Many Samsung devices store a flash counter that keeps track of how many times you have flashed custom firmwares to your device. Triangle Away can be used to reset the flash counter to zero.

Thank's to all fellas at XDA who first tried out this rooting technique. This method was originally posted via XDA-Developers original thread.

EZCast for Windows PC reaches version 1.1.0.79


What's new in Windows PC EZCast v.1.1.0.79 version (2014-08-07)
1. add web, cloud video, live tv functions.
2. Add comment function. 


Here you can download the previous versions pack.
Tronsmart T1000 is an amazing Mirror2TV dongle.

How to Root Using Android 4.2.2 Jelly Bean Without Tripping the KNOX Warranty Void Counter Samsung Galaxy S4 Mini (Verizon) SCH-I435 Guide


Samsung Galaxy S4 Mini (Verizon) SCH-I435 users who wish to root their devices running on Android 4.2.2 Jelly Bean, may follow the tutorial below.
This tutorial uses Root Exploit package released by Senior XDA-Developers, k1mu. The Root Exploit package allows Galaxy S4 Mini users to root their devices easily without tripping the KNOX warranty void counter.

Disclaimer: We and the developer of this rooting procedures shall not be held responsible if any undesirable outcomes may happen to your device. use of this root guide is solely at your own risk!

Note: This method will NOT set the KNOX warranty void flag. It will set the "Custom" flag, but that's nothing to worry about. Tested working on the Galaxy S4 Mini (Verizon) SCH-I435 with Android 4.2.2 VRUAMK5 Jelly Bean.

Pre-requisites
1. Install USB Drivers for Samsung Galaxy S4 Mini on the computer.
2. Enable USB Debugging Mode on the phone by navigating to Settings >> Developer Options.
3. Make a backup of all your important data before following the guide.
4. Ensure the battery of the phone is charged more than 80 percent.
5. The Root Exploit package works only on the Verizon version of the Galaxy S4 Mini (SCH-I435). Applying this to any incorrect variant might brick the device. Verify the model number of the Galaxy S4 Mini by navigating to Settings >> About Phone.
File Required
1. Root Exploit (saferoot.zip)
Steps to Root Galaxy S4 Mini (Verizon) SCH-I435 Running on Android 4.2.2 Jelly Bean
Step 1: Extract the Root Exploit package to the computer using WinRAR/7-Zip/WinZip or any other extracting tool.
Step 2: Connect the Galaxy S4 Mini to the computer using USB cable.
Step 3: On the computer, navigate to the extracted directory and double click "install.bat" file. You will see command prompt window which will detect your device and automatically run the scripts.

If you are using Linux or Mac OS X, navigate to the extracted directory in a terminal window and type "sh ./install.sh".

Step 4: Follow the on-screen instructions. Once the rooting procedure completes, your phone will reboot automatically.

That's it! Samsung Galaxy S4 Mini (Verizon) SCH-I435 with Android 4.2.2 Jelly Bean is now rooted successfully. Open the app drawer of the phone and check for an app called SuperSU. Verify the root status of the device by downloading Root Checker app from Google Play Store.

Note: Many Samsung devices store a flash counter that keeps track of how many times you have flashed custom firmwares to your device. Triangle Away can be used to reset the flash counter to zero.

How to Fix "Unfortunately, SuperSU has stopped"?
Step 1: Download and install the latest APK of SuperSU on your device.
Step 2: Open SuperSU app (update the binary if prompted) and allow it to disable KNOX.
Step 3: Reboot your device.

Thank's to all fellas at XDA who first tried out this rooting technique. This method was originally posted via XDA-Developers original thread.

How to Root Android 4.2.2 Jelly Bean Without Tripping the KNOX Warranty Void Counter Samsung Galaxy S4 Mini (Sprint) SPH-L520 Guide


Samsung Galaxy S4 Mini (Sprint) SPH-L520 users who wish to root their devices running on Android 4.2.2 Jelly Bean, may follow the tutorial below.
This tutorial uses Root Exploit package released by Senior XDA-Developers, k1mu. The Root Exploit package allows Galaxy S4 Mini users to root their devices easily without tripping the KNOX warranty void counter.

Disclaimer: We and the developer of this rooting procedures shall not be held responsible if any undesirable outcomes may happen to your device. use of this root guide is solely at your own risk!

Note: This method will NOT set the KNOX warranty void flag. It will set the "Custom" flag, but that's nothing to worry about.

Pre-requisites
1. Install USB Drivers for Samsung Galaxy S4 Mini on the computer.
2. Enable USB Debugging Mode on the phone by navigating to Settings >> Developer Options.
3. Make a backup of all your important data before following the guide.
4. Ensure the battery of the phone is charged more than 80 percent.
5. The Root Exploit package works only on the Sprint version of the Galaxy S4 Mini (SPH-L520). Applying this to any incorrect variant might brick the device. Verify the model number of the Galaxy S4 Mini by navigating to Settings >> About Phone.

File Required
1. Root Exploit (saferoot.zip)

Steps to Root Galaxy S4 Mini (Sprint) SPH-L520 Running on Android 4.2.2 Jelly Bean
Step 1: Extract the Root Exploit package to the computer using WinRAR/7-Zip/WinZip or any other extracting tool.
Step 2: Connect the Galaxy S4 Mini to the computer using USB cable.
Step 3: On the computer, navigate to the extracted directory and double click "install.bat" file. You will see command prompt window which will detect your device and automatically run the scripts.

If you are using Linux or Mac OS X, navigate to the extracted directory in a terminal window and type "sh ./install.sh".

Step 4: Follow the on-screen instructions. Once the rooting procedure completes, your phone will reboot automatically.

That's it! Samsung Galaxy S4 Mini (Sprint) SPH-L520 with Android 4.2.2 Jelly Bean is now rooted successfully. Open the app drawer of the phone and check for an app called SuperSU. Verify the root status of the device by downloading Root Checker app from Google Play Store.

Note: Many Samsung devices store a flash counter that keeps track of how many times you have flashed custom firmwares to your device. Triangle Away can be used to reset the flash counter to zero.

Thank's to all fellas at XDA who first tried out this rooting technique. This method was originally posted via XDA-Developers original thread.

Samsung Galaxy S4 Mini I9190 with Android 4.2.2 XXUBNB1 Jelly Bean Official Firmware & How to Update Using Odin Tools Guide


Samsung has released the latest Android 4.2.2 Jelly Bean update with firmware build number I9190XXUBNB1 for Galaxy S4 Mini with model number GT-I9190. The new official firmware is currently available as an Over-The-Air (OTA) update as well as through Samsung KIES.
Firmware details
PDA: I9190XXUBNB1
CSC: I9190OJVBNB1
MODEM: I9190XXUBNB1
Version: Android 4.2.2
Build date: Feb 03, 2014
Regions: Iraq, Afghanistan, Algeria, Iran, Kenya, Morocco, Pakistan, Saudi Arabia, South Africa, Tunisia, Turkey, United Arab Emirates

Samsung Galaxy S4 Mini I9190 users who missed the OTA update notification or unable to access the update over Samsung KIES, can now download and install the same manually using our step-by-step guide.
Pre-requisites
1. Install USB Drivers for Samsung Galaxy S4 Mini on the computer.
2. Enable USB Debugging Mode on the phone by navigating to Settings >> Developer Options.
3. Make a backup of all your important data before following the guide.
4. Ensure the battery of the phone is charged more than 80 percent.
5. The Android 4.2.2 XXUBNB1 Jelly Bean firmware is compatible only with the 3G version of Samsung Galaxy S4 Mini (GT-I9190). Applying this to any incorrect variant might brick the device. Verify the model number of the Galaxy S4 Mini by navigating to Settings >> About Phone.
Files Required
1. Android 4.2.2 XXUBNB1 Jelly Bean Firmware (Mirror Link) for Galaxy S4 Mini I9190
2. Odin 3.07
Steps to Update Galaxy S4 Mini I9190 with Android 4.2.2 XXUBNB1 Jelly Bean Firmware
Step 1: Extract Firmware zip file using WinRAR/7-Zip/WinZip or any other extracting tool, you will get a .tar.md5 file and some other files (optional).
Step 2: Extract Odin zip file and you will get Odin3 v3.07.exe along with few other files.
Step 3: Switch off the Galaxy S4 Mini.
Step 4: Boot the device into Download Mode by pressing and holding Volume Down, Home and Power buttons together until a construction Android robot icon with a warning triangle appears on screen. Now press the Volume Up button to enter Download Mode.
Step 5: Run Odin on the computer as an Administrator.
Step 6: Connect the Galaxy S4 Mini to the computer using USB cable while it is in the Download Mode. Wait until Odin detects the device. When the device is connected successfully, the ID: COM box will turn to light blue with the COM port number. Additionally, the successful connected will be indicated by a message saying Added.

Step 7: Select the following files in Odin from extracted I9190XXUBNB1 firmware folder:
  • Click the PDA button and select the .tar.md5 file.
  • Click the Phone button and select file with MODEM in its name. Ignore if there is no such file.
  • Click the CSC button and select file with CSC in its name. Ignore if there is no such file.
  • Click the PIT button and select the .pit file. Ignore if there is no such file.
Step 8: In Odin, enable Auto Reboot and F. Reset Time checkboxes. Also, ensure the Re-Partition checkbox is chosen only if a .pit file was chosen in the previous step.
Step 9: Verify everything suggested in Step 7 and Step 8 is done correctly. Then hit the Start button to begin the installation process.
Step 10: Once the installation process is completed, your phone will restart and soon you will see a PASS message with green background in the left-most box at the very top of the Odin. You can now unplug the USB cable to disconnect it from the computer.

Samsung Galaxy S4 Mini I9190 should be now updated with official Android 4.2.2 XXUBNB1 Jelly Bean. Head over to Settings >> About Phone to verify the software version running on the device.

Note: If Galaxy S4 Mini I9190 stuck at booting animation after Step 10 then go to recovery mode (press and hold the Volume Up, Home and Power buttons together) and perform Wipe data/Factory Reset and Wipe Cache Partition task before selecting reboot system now function. In recovery mode use Volume keys to navigate between options and Power key to select the option. Please note, performing wiping task will erase your device internal memory data and not external SD card data.

How to Update Samsung Galaxy S4 Mini Duos I9192 with Android 4.2.2 XXUBNB1 Jelly Bean Official Firmware


Samsung Galaxy S4 Mini Duos (GT-I9192) has already received the latest Android 4.2.2 Jelly Bean update with firmware build number I9192XXUBNB1. The new official firmware is now available as an Over-The-Air (OTA) update as well as through Samsung KIES.
Firmware details
PDA: I9192XXUBNB1
CSC: I9192OJVBNB1
MODEM: I9192XXUBNB1
Version: Android 4.2.2
Build date: Feb 04, 2014
Regions: Saudi Arabia, Afghanistan, Algeria, Egypt, Iran, Iraq, Kenya, Libya, Morocco, Pakistan, South Africa, Tunisia, United Arab Emirates
Samsung Galaxy S4 Mini Duos I9192 users who missed the OTA update notification or unable to access the update over Samsung KIES, can now download and install the same manually using our step-by-step guide.
Pre-requisites
1. Install USB Drivers for Samsung Galaxy S4 Mini on the computer.
2. Enable USB Debugging Mode on the phone by navigating to Settings >> Developer Options.
3. Make a backup of all your important data before following the guide.
4. Ensure the battery of the phone is charged more than 80 percent.
5. The Android 4.2.2 XXUBNB1 Jelly Bean firmware is compatible only with the Galaxy S4 Mini Duos (GT-I9192). Applying this to any incorrect variant might brick the device. Verify the model number of the Galaxy S4 Mini by navigating to Settings >> About Phone.
Files Required
1. Android 4.2.2 XXUBNB1 Jelly Bean Firmware (Mirror Link) for Galaxy S4 Mini Duos I9192
2. Odin 3.07

Steps to Update Galaxy S4 Mini Duos I9192 with Android 4.2.2 XXUBNB1 Jelly Bean Firmware
Step 1: Extract Firmware zip file using WinRAR/7-Zip/WinZip or any other extracting tool, you will get a .tar.md5 file and some other files (optional).
Step 2: Extract Odin zip file and you will get Odin3 v3.07.exe along with few other files.
Step 3: Switch off the Galaxy S4 Mini.
Step 4: Boot the device into Download Mode by pressing and holding Volume Down, Home and Power buttons together until a construction Android robot icon with a warning triangle appears on screen. Now press the Volume Up button to enter Download Mode.
Step 5: Run Odin on the computer as an Administrator.
Step 6: Connect the Galaxy S4 Mini to the computer using USB cable while it is in the Download Mode. Wait until Odin detects the device. When the device is connected successfully, the ID: COM box will turn to light blue with the COM port number. Additionally, the successful connected will be indicated by a message saying Added.

Step 7: Select the following files in Odin from extracted I9192XXUBNB1 firmware folder:
  • Click the PDA button and select the .tar.md5 file.
  • Click the Phone button and select file with MODEM in its name. Ignore if there is no such file.
  • Click the CSC button and select file with CSC in its name. Ignore if there is no such file.
  • Click the PIT button and select the .pit file. Ignore if there is no such file.
Step 8: In Odin, enable Auto Reboot and F. Reset Time checkboxes. Also, ensure the Re-Partition checkbox is chosen only if a .pit file was chosen in the previous step.
Step 9: Verify everything suggested in Step 7 and Step 8 is done correctly. Then hit the Start button to begin the installation process.
Step 10: Once the installation process is completed, your phone will restart and soon you will see a PASS message with green background in the left-most box at the very top of the Odin. You can now unplug the USB cable to disconnect it from the computer.
Samsung Galaxy S4 Mini Duos I9192 should be now updated with official Android 4.2.2 XXUBNB1 Jelly Bean. Head over to Settings >> About Phone to verify the software version running on the device.
Note: If Galaxy S4 Mini Duos I9192 stuck at booting animation after Step 10 then go to recovery mode (press and hold the Volume Up, Home and Power buttons together) and perform Wipe data/Factory Reset and Wipe Cache Partition task before selecting reboot system now function. In recovery mode use Volume keys to navigate between options and Power key to select the option. Please note, performing wiping task will erase your device internal memory data and not external SD card data.

Read also: How to Root Galaxy S4 Mini Duos I9192 on Android 4.2.2 Jelly Bean and Install CWM Recovery

How to Root Android 4.2.2 Jelly Bean and Install CWM Recovery Samsung Galaxy S4 Mini Duos I9192 Guide


Samsung Galaxy S4 Mini Duos I9192 users who wish to root and install ClockworkMod Recovery (CWM) on their devices, may follow our step-by-step guide below.
This tutorial uses CWM and Root Kit files released by Recognized XDA-Developers, arco68. It allows Galaxy S4 Mini Duos users to root their devices without any difficulty.
Disclaimer: Rooting voids the warranty of your device. We and the developer of this rooting procedures shall not be held responsible if any undesirable outcomes may happen to your device. use of this root guide is solely at your own risk!
Pre-requisites
1. Install USB Drivers for Samsung Galaxy S4 Mini on the computer.
2. Enable USB Debugging Mode on the phone by navigating to Settings >> Developer Options.
3. Make a backup of all your important data before following the guide.
4. Ensure the battery of the phone is charged more than 80 percent.
5. The CWM and Root Kit files works only on the Galaxy S4 Mini with dual SIM card support (GT-I9192). Applying these to any incorrect variant might brick the device. Verify the model number of the Galaxy S4 Mini by navigating to Settings >> About Phone.
Files Required
1. CWM (recovery-clockwork-6.0.4.6-serranodsub.tar.zip)
2. Root Kit (S4Mini_RootKit_v2.zip)
3. Odin 3.09 Mirror Link
Steps to Root Galaxy S4 Mini Duos I9192 Running on Android 4.2.2 Jelly Bean Firmware
Step 1: Extract the CWM .zip and Odin 3.09 .zip files using WinRAR/7-Zip/WinZip or any other extracting tool.
Step 2: Copy the Root Kit .zip file to the SD card of your phone.
Step 3: Switch off the Galaxy S4 Mini. Then boot into Download Mode by pressing and holding Volume Down, Home and Power buttons together until a construction Android robot icon with a warning triangle appears on screen. Now press the Volume Up button to enter Download Mode.
Step 4: Launch Odin on the computer as an Administrator.
Step 5: Connect the Galaxy S4 Mini to the computer using USB cable while it is in the Download Mode. Wait until Odin detects the device. When the device is connected successfully, the ID: COM box will turn to light blue with the COM port number. Additionally, the successful connected will be indicated by a message saying Added.
Step 6: In Odin, click the AP button and select the CWM .tar.md5 file. Make sure that the F. Reset Time checkbox is NOT selected.
Step 7: Double-check and click Start button in Odin. The installation process will now begin.
Step 8: Once the installation process completes, your phone will reboot automatically. When the phone vibrates, IMMEDIATELY press and hold Volume Up, Home and Power buttons at the same time to boot into CWM Recovery.
Step 9: In CWM Recovery, select "install zip from sdcard" option then select "choose zip from sdcard". Now, navigate to the Root Kit .zip file that you copied earlier and confirm the installation by selecting Yes.
Step 10: Once the installation process completes, return to main recovery menu and select "reboot system now".
Samsung Galaxy S4 Mini Duos I9192 running on Android 4.2.2 Jelly Bean is now rooted successfully. You can now install any app that requires root permission. Verify the root status of the device by downloading Root Checker app from Google Play Store.
Note: Many Samsung devices store a flash counter that keeps track of how many times you have flashed custom firmwares to your device. Triangle Away can be used to reset the flash counter to zero.
How to Fix "Unfortunately, SuperSU has stopped"?
Step 1: Download and install the latest APK of SuperSU on your device.
Step 2: Open SuperSU app (update the binary if prompted) and allow it to disable KNOX.
Step 3: Reboot your device.
Thank's to all fellas at XDA who first tried out this rooting technique. This method was originally posted via XDA-Developers original thread.

Samsung Galaxy S4 Mini (Latin) I9195L with Android 4.2.2 UBUBNC1 Jelly Bean Official Firmware & How to Update Using Odin Guide


The Latin American version of Samsung Galaxy S4 Mini with LTE network support (GT-I9195L) has already received a new Android 4.2.2 Jelly Bean update with firmware build number I9195LUBUBNC1. The new official update is currently available as an Over-The-Air (OTA) update as well as through Samsung KIES.

Firmware details
PDA: I9195LUBUBNC1
CSC: I9195LUUBBNC3
MODEM: I9195LUBUBNC1
Version: Android 4.2.2
Build date: Mar 14, 2014
Regions: Trinidad and Tobago

Samsung Galaxy S4 Mini (Latin) I9195L users who missed the OTA update notification or unable to access the update over Samsung KIES, may follow our step-by-step guide to install the update manually.

Pre-requisites
1. Install USB Drivers for Samsung Galaxy S4 Mini on the computer.
2. Enable USB Debugging Mode on the phone by navigating to Settings >> Developer Options.
3. Make a backup of all your important data before following the guide.
4. Ensure the battery of the phone is charged more than 80 percent.
5. The Android 4.2.2 UBUBNC1 Jelly Bean firmware is compatible only with the LTE version of the Galaxy S4 Mini with model number GT-I9195L. Applying this to any incorrect variant might brick the device. Verify the model number of the Galaxy S4 Mini by navigating to Settings >> About Phone.

Files Required
1. Android 4.2.2 UBUBNC1 Jelly Bean Firmware (Mirror Link)
2. Odin 3.07

Steps to Update Galaxy S4 Mini (Latin) I9195L with Android 4.2.2 UBUBNC1 Jelly Bean Firmware
Step 1: Extract Firmware zip file using WinRAR/7-Zip/WinZip or any other extracting tool, you will get a .tar.md5 file and some other files (optional).
Step 2: Extract Odin zip file and you will get Odin3 v3.07.exe along with few other files.
Step 3: Switch off the Galaxy S4 Mini.
Step 4: Boot the device into Download Mode by pressing and holding Volume Down, Home and Power buttons together until a construction Android robot icon with a warning triangle appears on screen. Now press the Volume Up button to enter Download Mode.
Step 5: Run Odin on the computer as an Administrator.
Step 6: Connect the Galaxy S4 Mini to the computer using USB cable while it is in the Download Mode. Wait until Odin detects the device. When the device is connected successfully, the ID: COM box will turn to light blue with the COM port number. Additionally, the successful connected will be indicated by a message saying Added.

Step 7: Select the following files in Odin from extracted I9195LUBUBNC1 firmware folder:
  • Click the PDA button and select the .tar.md5 file.
  • Click the Phone button and select file with MODEM in its name. Ignore if there is no such file.
  • Click the CSC button and select file with CSC in its name. Ignore if there is no such file.
  • Click the PIT button and select the .pit file. Ignore if there is no such file.
Step 8: In Odin, enable Auto Reboot and F. Reset Time checkboxes. Also, ensure the Re-Partition checkbox is chosen only if a .pit file was chosen in the previous step.
Step 9: Verify everything suggested in Step 7 and Step 8 is done correctly. Then hit the Start button to begin the installation process.
Step 10: Once the installation process completes, your phone will restart and soon you will see a PASS message with green background in the left-most box at the very top of the Odin. You can now unplug the USB cable to disconnect it from the computer.

Samsung Galaxy S4 Mini (Latin) I9195L should be now updated with Android 4.2.2 UBUBNC1 Jelly Bean official firmware. Head over to Settings >> About Phone to verify the software version running on the device.

Note: If Galaxy S4 Mini (Latin) I9195L stuck at booting animation after Step 10 then go to recovery mode (press and hold the Volume Up, Home and Power buttons together) and perform Wipe data/Factory Reset and Wipe Cache Partition task before selecting reboot system now function. In recovery mode use Volume keys to navigate between options and Power key to select the option. Please note, performing wiping task will erase your device internal memory data and not external SD card data.
Read also: How to Root Galaxy S4 Mini (LTE) I9195 on Android 4.2.2 Jelly Bean Firmware

How to Root Using Android 4.2.2 Jelly Bean Firmware On Samsung Galaxy S4 Mini (LTE) I9195 Guide


Samsung Galaxy S4 Mini (LTE) I9195 users who wish to root their devices running on Android 4.2.2 Jelly Bean, may follow our step-by-step guide.

This tutorial uses ClockworkMod Recovery (CWM) and an insecure kernel released by Recognized XDA-Developers, arco68. It is allows Galaxy S4 Mini users to root their devices without any difficulty.

Disclaimer: Rooting voids the warranty of your device. We and the developer of this rooting procedures shall not be held responsible if any undesirable outcomes may happen to your device. use of this root guide is solely at your own risk!

Pre-requisites
1. Install USB Drivers for Samsung Galaxy S4 Mini on the computer.
2. Enable USB Debugging Mode on the phone by navigating to Settings >> Developer Options.
3. Make a backup of all your important data before following the guide.
4. The Galaxy S4 Mini should be factory unlocked and not locked to any particular carrier.
5. Ensure the battery of the phone is charged more than 80 percent.
6. The CWM recovery and Root Kit files works only on the LTE version of Samsung Galaxy S4 Mini (GT-I9195). Applying these to any incorrect variant might brick the device. Verify the model number of the Galaxy S4 Mini by navigating to Settings >> About Phone.

Files Required
1. CWM - Mirror Link (recovery-clockwork-6.0.4.6-serranoltexx.tar.zip)
2. Root Kit - Mirror Link (S4Mini_RootKit_v2.zip)
3. Kernel - Mirror Link (GT-I9195_Kernel_v1.zip)
4. Odin 3.09 - Mirror Link

Steps to Root Galaxy S4 Mini (LTE) I9195 Running on Android 4.2.2 Jelly Bean Firmware
Step 1: Extract the CWM recovery .zip and Odin .zip files using WinRAR/7-Zip/WinZip or any other extracting tool.
Step 2: Copy the RootKit .zip and Kernel .zip files to the SD card of your phone.
Step 3: Switch off the Galaxy S4 Mini. Then boot into Download Mode by pressing and holding Volume Down, Home and Power buttons together until a construction Android robot icon with a warning triangle appears on screen. Now press the Volume Up button to enter Download Mode.
Step 4: Launch Odin on the computer as an Administrator.
Step 5: Connect the Galaxy S4 Mini to the computer using USB cable while it is in the Download Mode. Wait until Odin detects the device. When the device is connected successfully, the ID: COM box will turn to light blue with the COM port number. Additionally, the successful connected will be indicated by a message saying Added.

Note: If the Added message does not appear, then try re-install USB drivers or changing the port on the computer.

Step 6: In Odin, click the AP button and select the CWM recovery .tar.md5 file. Verify that F. Reset Time checkbox is NOT selected.
Step 7: Double-check and click Start button in Odin. The installation process will now begin.
Step 8: Once the installation process completes, your phone will reboot automatically. When the phone vibrates, IMMEDIATELY press and hold Volume Up, Home and Power buttons at the same time to boot into CWM Recovery.
Step 9: In CWM Recovery, select "install zip from sdcard" option then select "choose zip from sdcard". Now, navigate to the RootKit .zip file that you copied earlier and confirm the installation.
Step 10 (optional): Return to main recovery menu and repeat Step 9 but this time select the Kernel .zip file to use a custom stock kernel, which might fix battery drain for some.
Step 11: Once the installation process completes, return to main recovery menu and select "reboot system now".

Samsung Galaxy S4 Mini (LTE) I9195 running on Android 4.2.2 Jelly Bean is now rooted successfully. You can now install any app that requires root permission. Verify the root status of the device by downloading Root Checker app from Google Play Store.

Thank's to all fellas at XDA who first tried out this rooting technique. This method was originally posted via XDA-Developers original thread.

Download latest stock firmware for Onda V975s Tablet


Download latest stock firmware for Onda V975s Tablet from here, here or from here.

 
Firmware: V975S_Core4_V3.4.0_V7-0818
Model: Onda V975s Tablet
Image file size: 444 MB
Platform: A31s


Onda V975s Tablet Specs
CPU: A31s Quad Core
GPU: Power VR SGX544
RAM     1GB,DDR3
Storage  16GB
Screen: G+G Capacitive Touchscreen, 1024*768 High-resolution Screen
Size:   9.7 inch
Display:  HD TFT Screen
Resolution:    1024*768 Pixels
Visible Angle: 178°
Dual Camera     Front camera, 2.0 Megapixels  Back camera, 2.0 Megapixels
 

Download Onda Suite v.02.03.00


Download Onda Suite v.02.03.00 from here, here or here.

Download Android Jelly Bean 4.2.2 Stock Firmware for Ramos i8 tablet


Download Android Jelly Bean 4.2.2 Stock Firmware for Ramos i8 tablet from here, here or here.

Archive name: Ramos i8-20140108
Archive file size: 282 MB
Support: Intel Atom Z2580
Build number: redhookbay-userdebug 4.2.2 JDQ39 eng.svnadmin.20140106.195926 test-keys


Download Android stock firmware for Beelink MXIII TV Box


Download Android stock firmware for Beelink MXIII 2G/8G TV Box from here, here or from here.

Firmware: M82_108k4.rar  
Archive file size: 353 MB
Model: MXIII 2G/8G
base: M82_107k4
Date: 2014.08.02
Platform: Amlogic S802
Image file name: M82_108k4.img


Download Android stock firmware for Beelink MXIII 1G/8G TV Box from here, here or from here.

Firmware: M82_108k4_1gddr_rtl8188.rar  
Archive file size: 352 MB
Model: MXIII 1G/8G
base: M82_108k4_1gddr_rtl8188
Date: 2014.08.02
Platform: Amlogic S802
Image file name: M82_108k4_1gddr_rtl8188.img


What's new:
1. Add 1080P24Hz support;

2. Support for NTFS/CIFS; --Offered by wasser

3. Change Input method to Latin,and remote can use;

4. Update Play Store; 

5. Support for Mele F10 air-mouse; --Pulled from Bob's FW

6. Support for Xbox/PS3; --Offered by Bob

7. Change method of Root access; --Offered by leolas

8. Add kill-recent-task function; --Offered by daemonium

9. Update xbmc to Gotham 13.1,fix 4k playback and 2160P/720P HDMI display issue; --THX stane

10. Add remote function in Recovery Mode;--THX leolas

11. Adjust MBXLauncher,add Yahoo wether and Clean-Memory function,fix slow animation issue;

12. Fix issue->Power-key of Remote might lead to reboot;

13. Improve small probable of blurred screen.